Don’t Miss Out on the Latest Updates.
Subscribe to Our Newsletter Today!
-

- ENG
![]() Written by Nani Rao |Updated : January 15, 2015 3:48 PM IST
Written by Nani Rao |Updated : January 15, 2015 3:48 PM IST
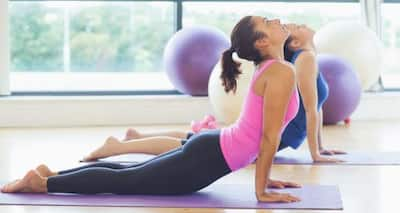
Surya Namaskar or the Sun Salutation is one of the most well-known yoga routines. For good reason, as performing surya namaskar early in the morning can have several health benefits. The routine consists of 12 forward and backward bending movements that stretch and flex the spinal column. It's not that difficult to learn, and great for beginners who are looking to introduce themselves to yoga.
Surya Namaskar has a deep effect in detoxifying the organs through copious oxygenation and has a deeper relaxing effect.
The flowing series of 12 yoga postures are described below:
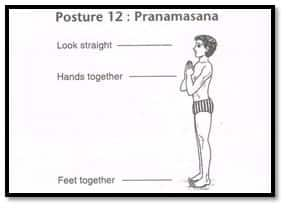
1. Pranamasana
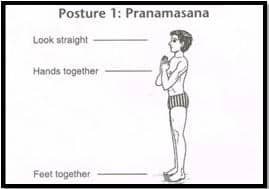 Stand erect with feet together. Join the palms together in front of the chest in a namaskar mudra. Concentrate on standing straight, steady and in a meditative mood. This posture helps to induce a state of introversion, relaxation and calmness. It activates the anahata chakra or pranic centre an energy centre located in the heart region. Breathing: Slow and steady breathing.
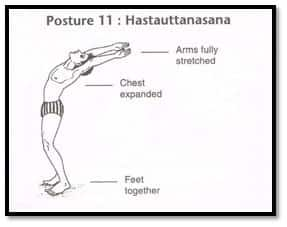
2. Hasta Uttanasana
 Stretch both arms above the head, palms facing upward. Arch the back and stretch the whole body. This posture stretches the chest and the abdomen and lifts the prana (energy) upwards to the upper parts of the body. Breathing: Start inhaling as you stretch both arms, and hold breath (kumbhaka) in the stretched arm position.
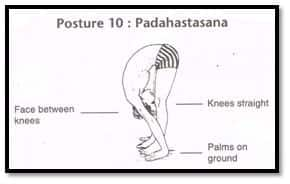
3. Pada Hastasana
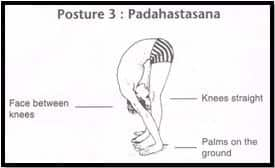 Bend the body forward and down, keeping the spine straight. Avoid collapsing the chest or over-rounding the upper back. Keep the legs straight and perpendicular to the ground. The knees may be allowed to bend a little, if needed. This posture massages the abdominal organs. The power of digestion increases and female disorders such as menstrual irregularities are relieved. A healthy flow of blood is sent to the spinal nerves as they are stretched and toned. The hamstring muscles at the back of the thigh and calf muscles are also stretched. Inversion increases blood flow to the brain. The prana is channelized to the lower regions of the body propelled by exhalation. Breathing: Start exhaling (rechak) as you bend forward. Exhale fully as you reach the bent position.
4. Ashwa Sanchalanasana
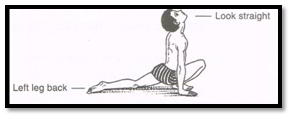 Extend the left leg back and drop the right knee to the ground. The right knee is bent up and kept between the palms and the right foot placed flat on the ground. Lift the spine and expand the chest. Look straight and concentrate at the centre of eyebrows. Breathing: Start inhaling (purak) and fill your lungs as you reach the position.
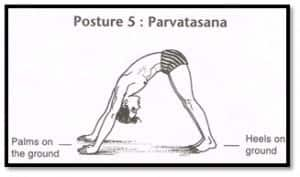 Bring the right leg back to join with the left leg. Simultaneously raise the buttocks and lower the head between the arms so the body forms a triangle with the floor. Try to place the heels flat on the ground. Focus your awareness at the neck area. This posture strengthens the nerves and muscles in the arms and legs, stretches the calf muscles and makes the spine straight and taut. It relieves varicose veins and tones spinal nerves. Breathing: Start exhaling (rechak) and completely exhale as you reach the posture.
6. Sashtanga Namaskar
 Gently drop both knees to the ground and slowly slide the body down at an angle as you bring the chest and chin to the ground. All eight limbs toes, knees, chest, hands and chin should touch the floor. The buttocks are kept up. This posture develops the chest and strengthens the arms. It sends additional blood to this area helping to rejuvenate the nerves. Breathing: Keep the breath out in the exhaled position (bahya kumbhak) as you reach the posture and start inhaling (purak) as you move to the next posture.
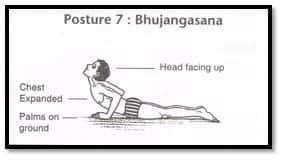 Lower the hips while pushing the chest forward and upward with the hands, until the spine is fully arched and the head is facing up. The knees and lower abdomen remain above the floor. Focus your awareness at the base of spine and feel the tension from the forward pull. This pose gives dynamic expansion to the organs of the chest and abdomen, relieving many ailments such as asthma, constipation, indigestion, kidney and liver problems. It is very helpful in relieving tension in the back muscles and spinal nerves. Breathing: Start inhaling. Fill lungs and hold breath (purak and anthar kumbhak) as you stay in this posture.
8. Parvatasana
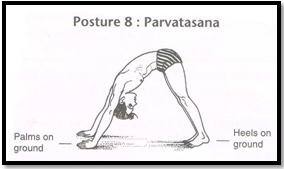 Move head backwards, keeping the palms flat touching the floor. Place both feet flat on the ground. Raise the buttocks and lower the head between the arms. This way you resume back to Posture 5. Breathing: Start exhaling as you reach the position.
9. Ashwa Sanchalanasana
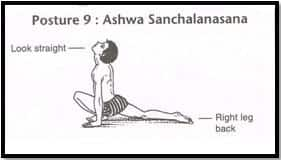 Extend the right leg back and drop the left knee to the ground. The left knee is bent up and kept between the palms with the sole of left foot flat on ground. Look straight and concentrate at the centre of eyebrows. Remember in Posture 4 the right leg was bent and the left leg was stretched backward. Breathing: Start inhaling as you take the position, hold breath (anthar kumbhak) for a few seconds.
10. Pada Hastasana
 Bring the stretched right foot forward. Join both legs and come back to Posture 3 i.e. bend forward bring the head between the knees. Breathing: Start exhaling as you take the position. Remain in Bahya Kumbhak for a few seconds. You can also try this yoga asana for weight loss.
11. Hasta Uttanasana
 Stretch arms backwards. Come back to Posture2. Breathing: Start inhaling as you reach position. Stay in anthar kumbhak (lungs filled) for a few seconds.
12. Pranamasana
 Straighten the body and bring the hands in front of the chest. Resume Posture 1. Breathing: Start exhaling as you bring the arms forward. Keep breathing normal in this position. Try hatha yoga to soothe your body mind and soul.
The above constitutes one round of Surya Namaskar. Rest for few seconds before starting the second round. Surya Namaskar, like most asanas, is recommended to be performed on an empty stomach. It is generally practiced in the morning before breakfast or in evening.
Practising up to 6 rounds is more beneficial. However, increase rounds gradually and steadily and never go beyond your capacity.
Synchronizing your breathing with the movements of the body is very important. The basic breathing principle is to inhale during backward bending postures and exhale during forward bending postures.
It is recommended that Surya Namaskar be done slowly with complete awareness of breathing. When the exercises are done a little quickly, the gain is more physical whereas if they are done slowly with breath awareness, the gain is more mental and spiritual. Perform Shavasana or Yoga Nidra after completing Surya Namaskar. (Read shitali pranayama to relax your body).
Images courtesy: Yoga Niketan, Getty Images
For more articles on yoga, check out our yoga section.For daily free health tips, sign up for our newsletter.
Don’t Miss Out on the Latest Updates.
Subscribe to Our Newsletter Today!